A tutorial for beginners and anyone looking for a Lightroom alternative
1.1 the Capture One license
If we look over to Lightroom – we see that there is only Lizezen as a subscription. Many don’t want that. It was the same for me. I’ve always been a fan of purchase licenses. The nice thing about Capture One is that there is both a subscription and a purchase license. And above all, there are even free versions. Capture One Express is the free version, it is available for Fujifilm and for Sony. The express version has a few limitations. One of them is, for example, that only the RAW files are read by Fuji or Sony cameras. Nevertheless, you get a lot here for free and I even say that most users will not notice that something is missing. You can find a precise comparison of the range of functions of the Express version with the Pro version directly at Phase One.
When you start Capture One Pro for the first time, you can choose from the following modes:
1.2. best image quality
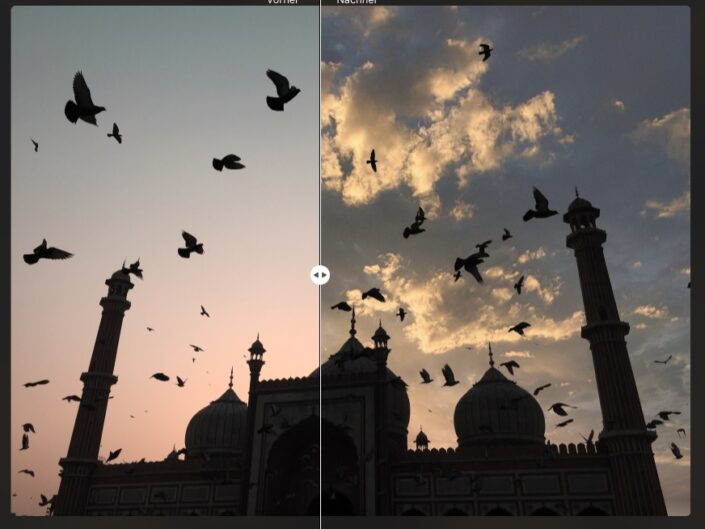
Well, image quality is difficult to measure – but it has long been clear among professionals that Capture One is the best RAW converter when it comes to pure image quality. Since the whole thing is very subjective, I recommend that you download a 30-day test version and get an idea of it yourself. Let’s take Fujifilm cameras as an example. Lightroom and many other RAW converters have a hard time with the sensor pattern of the X-T1, X-T2, X-T3 and all other Fuji X cameras. Worm-like artifacts become visible very quickly, which intensify very quickly during sharpening and make them unattractive. Of course, not tolerating that.
1.4. Camera support
It’s hard to find a camera that Capture One doesn’t support. The same is true for Lightroom – but Capture One is always a tick faster when new cameras appear. C1 currently supports over 500 camera models.
first 6. Capture Pilot
Another reason that speaks for Capture One is the so-called Capture Pilot. This is an app for your smartphone or tablet. These combine knowledge in many YouTube videos and on this page. Due to recurring demand, there are now very cheap styles for Capture One Pro from me. These bring a variety of looks to your pictures with just one click. The examples shown below were only processed with the styles mentioned. No further adjustments. You will find the link to the style pack above the slider and again below on this page. Have fun!
1.3. Sessions and catalogs
Yes, it is an important and often not easy decision. I explain to you the respective advantages and disadvantages of these two administrative options. Later in Chapter 3 in more detail, but now in a nutshell: a catalog is the one you know from Lightroom. Capture one manages the images that you import into the catalog. Of course you can have several catalogs in parallel. The great thing is that you can also work on several catalogs at the same time. This is not possible in Lightroom. The sessions are also great. Here you can browse directly to any folder on your computer without having to import images beforehand. It’s great when things have to go fast. Learn more about the differences between sessions and catalogs.
1.5. Tethered Shooting
Tethered shooting means that the camera is connected directly to the computer and, for example, in a studio photo session, the images taken are automatically imported directly. Capture One is the leader here. Because a tethering session does not have to be set up or activated – as soon as a camera is connected, tethering works and Capture One Pro pulls each image directly onto the computer in seconds and displays it. There is a separate chapter in this tutorial about tethering with Capture One Pro.
You have probably been a Lightroom user so far. Don’t worry, even if Capture One Pro looks overwhelmingly complex at first glance, it isn’t. It is enormously customizable and, above all, it is the tool that currently delivers the best image quality of your RAW images. Even if you are just starting out, you should consider carefully whether you will become a Lightroom or Capture One Pro user. The great thing is, as a beginner, you can test both programs for 30 days free of charge and find out which program is right for you and which one meets your image quality requirements. Fujifilm RAW images in particular have worm-like artifacts when sharpening in Lightroom. This is very unattractive and is not due to the Fujifilm cameras, but to how Lightroom interprets the sensor pattern of the Fuji cameras. Absolutely unacceptable processing. Here Capture One shines with a much clearer image processing. The images appear sharper without being over-sharpened. But especially when it comes to editing an image, Capture One can really shine, because the layers and especially the masking functions are far superior to Lightroom.
This means that even more complex processing with complex masking can be done in a very short time without having to open the image in Photoshop. Above all, the option of working in several catalogs or sessions in Capture One at the same time also helps me personally. A function that you will not find in Lightroom.
I recommend you to download the trial version of Capture One Pro now so that you can follow my tutorial and try out all the functions directly. If your trial version of Capture One Pro has expired, I have a discount code for you, so you save 10% on the purchase of your license. Here we go!
“For me there is no going back to Lightroom anymore. For me, Capture One Pro is the Lightroom alternative I’ve been looking for. The image quality cannot be compared! ”

Capture One Pro 20 Kurs
Jetzt Kaufen, sofort anschauen
und umsetzen
2.1 Introduction to the
Capture One Pro work environment
Capture One is very powerful. Understanding the tool in detail is essential for every photographer. So that you get along well in your daily work, it is also important that we adapt your work environment individually to your workflow.
The Capture One Pro work environment consists of 3 main elements: the Browser , the Viewer and the Tools . The fourth element could be the toolbar.
The browser shows thumbnails. Clicking on the respective preview picture opens it in the viewer. The viewer is therefore also the area in which we mainly work and where the actual image processing takes place.
There is no distinction between a library module and a development module as you know it from Lightroom. In my opinion, this distinction is also completely unnecessary. If you come from Lightroom, I recommend selecting Window -> Work Environment -> Migration in the menu. So you get an arrangement of the windows, which is modeled on Lightroom. This will make it easier for you to switch. Also important: both the browser and the viewer can be shown or hidden if necessary.
The viewer can also be placed on the left, right or below. The tools can also be placed on the left or right. This makes the Capture One Pro user interface very customizable. I myself put the keyboard shortcut “v” on and off the viewer. So I quickly get a grid view with an overview of all images in the current folder.
The most important keyboard shortcuts for the work environment:
2.2 Adjusting the workspaces
The tools themselves are organized in tabs. These tabs can be filled with tools as required. The standard setting of the tools is perfect for the beginning and does not have to be changed. However, it makes sense to add the Black & White tab with a right click in the upper area of the toolbar. All the important tools for a black and white conversion are gathered here. But more on that later.
Every tool can be moved freely. So you can adapt the order of the tools to your workflow. So you can insert any tool into any tab, even several times or take it out again. You can even pull it out to get a floating tool. The advantage of a floating tool is that you can place it directly over the image so that your gaze does not have to constantly wander away from the image to the toolbar.
My recommendation is nevertheless, stay with the standard for the time being and start adapting the workspaces later.
2.3 keyboard shortcuts
As in any program, especially when editing images, working with keyboard shortcuts can save you a great deal of time. It is therefore important that you memorize the most important keyboard shortcuts and, of course, set new ones when you need them. For this there is the item >> Edit keyboard shortcut << in the menu >> Edit <<
The most important keyboard shortcuts:
Often you can also use the SHIFT button to select other options for the respective tool. For example, SHIFT-r changes various options of the “straight turning tool”.
3.1 sessions
The sessions in Capture One are actually more of a holdover from earlier times. Nevertheless, they are super practical. Because a session has the charm that images do not have to be imported. When you create a session, it allows you to browse every folder on every hard drive and edit the images stored there immediately. These edits and changes are stored in the session.
Sessions are actually meant for sessions – as the name suggests – for photo sessions. This is how the pictures you take in tethering go directly to the Capture subfolder in the session folder. The session folder above it forms a unit of images and the associated Capture One data in order to work with this session and the processing carried out in it. For example, I like to create a session for individual customer orders. Or when I’m traveling, I also like to work in sessions. So these are self-contained, small projects.
3.2 Catalogs
Catalogs, on the other hand, work as you know them from other programs such as Lightroom. They are more meant to include multiple projects. Typically, you would organize your picture archive in a catalog. However, neither of the two variants has any real advantages or disadvantages. Because you can start Capture One several times in parallel. So you can work on several catalogs or sessions at the same time if necessary.
In general, I recommend you play with both variants at the beginning to find out what suits you best.
3.3 Import of a Lightroom catalog
in Capture One
If you switch from Lightroom to Capture One, it makes sense to create a new Capture One catalog and import your Lightroom catalog there. Capture One takes over all metadata. So your ratings will remain. The edits, however, are only approximate. After all, Lightroom and Capture one are completely different programs. It is not possible to take over completely identical processing automatically. Therefore, it makes sense that you check this carefully and, if necessary, export your pictures again from Lightroom as long as you still have a license.
Allow enough time to import your Lightroom library into Capture One. It is unfortunately not possible to say how long this will take, but several hours are quite realistic.
more about catalog or session
4.1 Crop
No matter how well you take pictures – a crop just has to be every now and then.
Then you can set the cut directly on the picture with the mouse pointer. Tip: there is a small triangle next to the cutting tool. If you click on it you get further options for the cropping in fixed aspect ratios or also for a free cropping.
4.3 Magnifying Glass
You activate the magnifying glass with the p. Now click and hold the mouse button on an image to see the corresponding area in 100% magnification. A long mouse click on the magnifying glass symbol in the toolbar shows you further options of the magnifying glass tool. There you can set the size of the magnifying glass and the magnification of the magnifying glass. Incidentally, the magnifying glass also works on preview images.
4.2 Rotate
The turning tool in Capture One Pro is very versatile:
Rotate straight: with this option, you simply draw a line in the image that should actually be straight. Vertical or horizontal. For example, you draw the horizon once. When you release the mouse, your picture is straight.
Freehand rotation : You can rotate the image freehand by holding down the mouse button
Rotate Left : Clicking on the image or on thumbnails rotates it to the left.
Rotate Right : Clicking the image or thumbnails will rotate it to the right.
5.1 exposure
The exposure control is roughly equivalent to a change in the exposure in the camera. It can be set from -4 to +4. So a little sensitivity is required. I usually click on the number with the mouse and then adjust the exposure with the keyboard and the up and down arrows. It is advisable to display a histogram in parallel or even to activate the exposure warning (symbol with triangle and exclamation mark in the toolbar). This exposure warning then shows both overexposed and underexposed areas in color and help you to find a suitable setting. On the whole, however, you should proceed according to your gut feeling.
5.2 contrast
Do you even know what contrast means? Right? With more contrast, dark areas of the image become darker and at the same time, bright areas of the image become lighter. You can use it to make a picture “crisper”. I think the contrast control is very nice and soft and can also be operated with the mouse. Again, you should just go for the image effect – there are no standard values.
5.3 brightness
The brightness control mainly takes the middle tone values in the pliers. I personally use this controller very rarely or not at all.
5.5 HDR tool
The HDR tool is basically similar to the contrast controller. However, you can only reduce the contrast with the HDR tool – but either selectively lighten the shadows or dim the lights. So if you have an image with a slightly overexposed sky, drag the “Lights” slider to the right. If the dark areas of the image are too dark, drag the Depth slider to the right. If you pull both sliders you increase the dynamic range of your picture and get an HDR picture. That stands for high dynamic range.
5.6 Clarity and structure
One of my favorite controls in Capture One Pro. Funny word… But hey, the clarity setting comes with the Structure slider. What really changes the two settings is difficult to describe, but I would describe it as follows: Clarity is a mixture of sharpness and contrast. Structure, on the other hand, is a kind of image sharpening for fine structures. This makes walls or other structures look more plastic, one could almost think that they can be felt on the screen. Great function, but be careful, because if you edit a portrait it can quickly be too much.
5.7 curves
Curves are indispensable in any professional image editing program or RAW converter. It is therefore clear that Capture One Pro also offers curves for contrast adjustment. The more special thing is that we find a so-called luma curve here. With the Luma curve you can adjust the contrast of your pictures without changing the colors or the color saturation of the pictures. Wow, very powerful!
6.1 What are styles
In Capture One, styles offer a good starting point for further image processing. I have all the styles that can be bought in the Capture One Shop. It’s not very cheap, but I use it regularly. By the way, my capture codes for Capture One Pro are also valid for the styles. I will show you how to create your own styles and how to use existing styles efficiently. If the styles at Capture One Pro are too expensive you should take a look at my cheap styles for Capture One Pro for download.
6.2 Styles on layers
Styles are basically applied to layers. In the simplest case to the background level. This is the standard case. However, the style is then applied to the entire image and cannot be masked. Right-clicking on the style gives you the option to apply it to a new level. Advantage 1: you can control the opacity of the layer and thus the opacity of the style. Advantage 2: you can mask. In other words: you can specify in which image areas the style should be used. So it is usually advisable to put styles on a new level and name them accordingly.
6.3 Create your own styles
To save the processing of an image as a style, simply click on the three dots in the Styles and Preferences tab. A small menu opens there. There you click on Save user style. In the following dialog you choose which edits should really be included in your style. For example, it makes sense not to include cropping, rotating, exposure, and white balance.
6.4 The styles by Michael Damböck
In order to pass on my experience in the field of image processing, I share my knowledge in many YouTube videos and on this page. Due to recurring demand, there are now very cheap styles for Capture One Pro from me. These bring a variety of looks to your pictures with just one click. The examples shown below were only processed with the styles mentioned. No further adjustments. You will find the link to the style pack above the slider and again below on this page. Have fun!
Icecave Style


Black Sand Style


Endlessness Style


Reykjavik Style


Vatnajökull Style


Death Valley Preset


Hollywood Preset


Joshua Tree Preset


Las Vegas Neon


San Francisco


Walt Disney


Arc de Triomphe


Les Cafés


Opera


Paris je t’aime


Tour Eiffel


Metro


Herbst Style 1


Herbst Style 2


Herbst Style 3


Herbst Style 4


Herbst Style 5


Herbst Style 6


Herbst Style 7


Colors are incredibly important in photography. And colors are one of the strengths of Capture One Pro. On the one hand, the RAW engine guarantees accurate handling and thus a high degree of reliability of colors and color profiles, and you can simulate the proof directly in the workflow and see what the subsequent print result will look like. In addition, the tools with which you can change and fine-tune colors are very easy to use and yet extremely versatile. Speaking of colors – there is black and white in the next chapter!
7.1 the direct color editor
New in Capture One Pro 20 is the direct color editor. To reach on the keyboard with the abbreviation d. With this tool you can manipulate the colors of your pictures directly in the picture. To do this, click on a color that you want to change and drag the mouse to the left and right. This changes the color of this color. Dragging up and down adjusts the saturation of this color. If you hold down the Alt key, you can adjust the brightness of this color by dragging left and right.
7.2 the advanced color editor
The advanced color editor is another of my favorite tools in C1. This is superior to the “Basic data” color editor in many ways. First you select the pipette in the tool, click on a color in the image that you want to change and then immediately see which color range C1 has captured in the color wheel. This color range can easily be changed with the mouse. You can both enlarge or reduce the color wheel and limit or expand the saturation range of the color selection. This allows an extremely precise color selection. It is always advisable to click the “Show selected color range” option.
Now the defined color range can be adjusted. Hue, saturation and brightness can be changed. Pro tip: A click on the 3 dots at the top right of the color editor tool shows the option “Create masked layer from selection”. With this little trick, C1 creates a new layer with a mask based on the color definition. So you can apply (almost) all other tools to this selection. The possibilities are unlimited!
7.3 Skin Tone Editor
Do you take portraits? Then you know the problem – skin is not always perfect. There is often redness or gloss or other problems. All of this has long been a task for Photoshop. Now you can fix these problems directly in the RAW Converter. Capture One offers the Skin Tone tool in the color editor. With this tool you can not only change the skin tones (tone, saturation, brightness) but above all also homogenize the skin. There are 3 separate controllers for this. The skin tone as well as the saturation and the brightness can be homogenized with it. For example, skin redness and shiny skin can be removed very easily. Pro tip: apply this tool to a new layer so you can mask it and adjust the opacity.
7.4 color balance
The color balance is mainly known from video editing. It doesn’t matter, on the contrary, I’m happy to be able to use this tool for photo editing too.
There are various possible uses for color balance. For example, you could use the global color balance to color the entire image. For example to get a warmer color look or a cooler color look. This is particularly exciting even if you want to color a whole lot of images in total and cannot or do not want to regulate it via the white balance.
The second application would be called classic color grading. For this there is the possibility to change the shadows, midtones and highlights separately in the “Three-way” tab. The tint, saturation and brightness of these three areas can be controlled. There are no fixed rules here. What is right is what you like. In addition, every picture and every photographer is different.
8.1 the paint mixer
The color mixer is the tool of choice for professional B / W conversion. You heard right. The color mixer for B / W conversion. Because in the color mixer we define how bright the respective colored areas of your picture will become in the B / W picture. So if you have a green meadow and then reduce green / yellow in the color mixer, the meadow in the B / W picture becomes very dark. If you master that you will get incredibly strong B / W pictures.
8.2 Dodge and Burn
Doge and Burn is of course not only used for B / W conversion. Rather, Dodge and Burn is a process in which you specifically change the contrast of your image in selective image areas. To do this, we lighten or darken certain areas of the image with a brush. To do this in Capture One Pro, we create the appropriate layers. So a level that brightens by a certain amount and a level that darkens by a corresponding amount. Then we use the brush tool to best brush with a weak opacity in our image or on the corresponding layer mask. You will learn how to use layers in Capture One Pro in the following paragraph.
Many only know layers from Photoshop. But definitely one of the hottest features of Capture One Pro are the layers. Above all, the way the layers work and how flexibly you can work with them. Layers help you to divide processing into segments. For example, you can very easily apply a different treatment to the sky than to the landscape. Or sometimes just make the eyes more contrasting, the possibilities are unlimited.
It is not difficult to create a new level. To do this, simply click on the “+” symbol in the Layers tab. Now you have to look closely. Because all tools now have a small brush symbol. This means that all edits that you are now doing are applied to this level. We’ll talk about masks in the next chapter. There you will learn how to restrict the visibility of a layer to certain areas of the image.
Without masking, layers would be pretty pointless. A mask hides the layer in some areas, so that you can apply your editing where it makes sense. A mask can be created in different ways. Depending on the picture. We now want to discuss these individually. But first an important info: if you press the m key on the keyboard, press M like mask, then the current mask in red is overlaid on your image. M hides this mask again.
10.1 Linear gradient mask
The most commonly used marking tool is the gradient tool. You can use it to create a linear gradient, perfect for masking a sky, for example. To do this, simply press the “g” key. G stands for gradient. You can then use the mouse to drag and drop a gradient mask. This means that all the edits you made on the level are applied 100% on one side of the history and not at all on the other side. There is a smooth transition in between.
10.2 Radial mask
Exactly the same as the linear gradient mask, but round. Quasi self-explanatory.
10.3 luminance mask
The luminance mask is a new feature in Capture One Pro 12. It allows you to easily create a mask based on the brightness of certain areas of the image. Perfect for image areas that are difficult to mask geometrically but are easily restricted by their brightness.
10.4 Mask with a brush
Manual work! You use the brush tool (key b) B for Brush , i.e. brush. A right click in the picture shows you the brush options. So you can paint with a soft or hard edge. The airbrush option is also very helpful. You have to paint over an area several times until it gets opacity.
Nothing works without a before and after view. However, the before and after function in Capture is not particularly intuitive. To see what your image looked like before editing, hold down the Alt key and click the “Reset Adjustments” arrow. It may take a while depending on the speed of your computer, but then you can see what you have achieved or screwed up so far.
Bonus: With each tool you will see a small arrow to reset the respective settings. If you press this while holding down the ALT key, you will see what your picture looks like without this setting.
Of course it is fun to edit pictures. But we don’t want to do the same processing 100 times. Therefore there are functions for copying and pasting settings. To do this, you first select the image from which you want to copy the editing. There you click on the up arrow in the top right of the toolbar. Then you select the one or more pictures on which you want to insert the editing and click on the down arrow. Voila, done!
If you want to adjust several images at the same time, you have to click on the symbol with the three frames in a row (top left). Then you insert the adjustments to all selected images at the same time.
By default, the image section and the rotation are not taken over – it usually makes sense. If you want to determine exactly which settings should be applied to other images, click on the symbol with the clipboard with a tick. There you can decide in detail what you want.
So, my dream of connecting a camera would be: I plug it into the computer and take pictures. Yup, that’s exactly how it works! For real! Of course, there are also plenty of options. For example, you can have the images automatically edited with a style directly after the transfer. Alternatively, you can give new images the editing of the previous images directly. The whole thing is incredibly fast and, above all, reliable, even on older computers.
If you don’t see the options for tethering , right-click in the toolbar and select Add -> Recording .
13.1 Capture Pilot
The Capture Pilot is a service that allows you to connect to your Capture One Pro on the desktop using the Capture Pilot app on your smartphone or tablet. In the app you can then see all your pictures, rate, zoom, and even trigger the camera with a small plugin. I use that for my photo booth. To be able to work with it, simply click on “ Start Image Server ” and open the App . Both devices must be in the same network.
It will surely surprise you when I tell you that on the one hand I always dealt very intensively with the topic sharpening in Lightroom and yet was never really satisfied with the sharpness, and on the other hand I never deal with sharpening at Capture One Pro and still am very satisfied with the sharpness. Sounds totally illogical – but Capture One Pro brings a much clearer image sharpness to my taste without creating the impression of an over-sharpening. If you don’t see the options for tethering , right-click in the toolbar and select Add -> Recording .
If you still want to sharpen it, you can integrate it directly into the processing of the image or, if necessary, when exporting your images.
The Sharpness Tool options include:
Strength – Self-explanatory, how much do you want to sharpen?
Radius – This controls the width of the sharpening edges
Threshold – Low values apply sharpening to the entire image – higher values increasingly only to areas with high contrast.
Atrial blur – This can be used to reduce halo artifacts that occur with particularly aggressive sharpening.
Exporting from Capture One Pro is very different from exporting as you know it from Lightroom. But the Capture one Pro export module is much more powerful.
15.1 Processing specifications
To define how an image should be exported, there are so-called processing specifications. This processing instruction must have a name. It is advisable to choose the name so that you still know later what was defined here. But that is not a must. In the processing instruction we now define the following things:
By the way, below in the tool “ Processing overview ” you can see at a glance how the export will work and you will get an estimate of how big your exported image will be.
15.2 Preview of export specification
At last! With a click on the glasses symbol in the toolbar you get a so-called proof view. This serves to see both the color profile of your current processing specifications and the image properties with regard to resolution and compression in order to optimize them again before exporting if necessary. So you can quickly decide which compression you want to choose for exports in JPG.
15.3 Export multiple images
Attention, if you want to export several images or variants at the same time, it is not enough to select the corresponding images at the same time. You also have to click the icon with the 4 stacked picture frames, otherwise you only export the picture that has the white frame.
15.4 Export multiple formats
If, for example, you want to export JPG in full resolution and JPG in web size at the same time, it is sufficient to check the two corresponding processing specifications and start the export. Capture One Pro now exports all of your selected images in all selected variants. MEGA!
A very frequently asked question: How can I export images from Capture One Pro with a white frame or border. The answer: unfortunately Capture One Pro has no function for saving with frames. But there is good news – at least for Mac users. This limitation can be avoided with Michael Damböck’s Border Tool for Capture One Pro.
Michael Damböck’s Border Tool for Capture One Pro Allows adding black or white frames when exporting from Capture One Pro.
Now there is the Capture One Border Tool also for Windows

incl. VAT
Buy Now!
incl. VAT
Buy Now!